PHP5 with Ubuntu 20.04 LTS LAMP Stack

PHP5 with Ubuntu 20.04 LTS LAMP Stack
Ubuntu Linux 20.04 comes with PHP 7.4. Some web site code written in the PHP 5 (or earlier) era is not compatible with that version of the hypertext preprocessor and will break under a new OS build with all up-to-date binaries.
The web hosting management app ISPConfig makes it easy to switch back and forth between versions of PHP – except the Apache module cannot be swapped out, therefore we are limited to using the actual PHP binary through the FastCGI and FastCGI Process Manager (FPM).
Installing an older version of a binary that comes with an operating system requires installing it under an alternate path, alongside all its libraries and configuration files. I like to use /usr/local for this, other ISPConfig tutorials use /opt
First, create the build folder and get the source:
mkdir -p /usr/local/src/php5-build/
cd /usr/local/src/php5-build/
wget http://de.php.net/get/php-5.6.40.tar.bz2/from/this/mirror -O php-5.6.40.tar.bz2
tar jxf php-5.6.40.tar.bz2
cd ./php-5.6.40
PHP5 requires OpenSSL v1 to compile – the system comes with OpenSSL 1.1.1 which will cause errors when compiling PHP5. Therefore we need OpenSSL version 1.0, which can also be installed under /usr/local/
Again, create the build folder and get your source code:
mkdir -p /usr/local/src/OpenSSL-Build/
cd /usr/local/src/OpenSSL-Build/
wget https://www.openssl.org/source/old/1.0.2/openssl-1.0.2u.tar.gz
tar xvfz openssl-1.0.2u.tar.gz
cd ./openssl-1.0.2u
There already is a Makefile in the folder, however we need to change the install path:
./config --prefix=/usr/local/opensslv1/
Then, run make, install and test the binary:
make
make install
/usr/local/opensslv1/bin/openssl version
  # >  OpenSSL 1.0.2u 20 Dec 2019
We can upgrade binaries in-place by choosing the same exact prefix in a new build: Extract a newer source code archive inside the build directory side-by-side with the older one and re-run the config, compile and install. For example, I initially used OpenSSL 1.0.0 which is a contemporary of PHP5.6.2 for troubleshooting and installed version 1.0.2 over it.
With OpenSSLv1 in place under /usr/local/opensslv1/ , we need to compile PHP5 to use this binary and its libraries:
cd /usr/local/src/php5-build/php-5.6.40
First, install the required libraries to resolve dependencies:
apt-get install libfcgi-dev libfcgi0ldbl libjpeg-turbo8-dbg libmcrypt-dev libssl-dev libc-client2007e libc-client2007e-dev libxml2-dev libbz2-dev libcurl4-openssl-dev libjpeg-dev libpng-dev libfreetype6-dev libkrb5-dev libpq-dev libxml2-dev libxslt1-dev
Then create the makefile.
In this instance, we are using a path including the minor version for A to B and regression testing. An install path (i.e. prefix) such as /usr/local/php5 will probably do.
./configure --prefix=/usr/local/php-5.6.40 --with-pdo-pgsql --with-zlib-dir --with-freetype-dir --enable-mbstring --with-libxml-dir=/usr --enable-soap --enable-calendar --with-mcrypt --with-zlib --with-gd --with-pgsql --disable-rpath --enable-inline-optimization --with-bz2 --with-zlib --enable-sockets --enable-sysvsem --enable-sysvshm --enable-pcntl --enable-mbregex --enable-exif --enable-bcmath --with-mhash --enable-zip --with-pcre-regex --with-mysql --with-pdo-mysql --with-mysqli --with-jpeg-dir=/usr --with-png-dir=/usr -with-xpm-dir=/usr --with-vpx-dir=/usr --enable-gd-native-ttf --with-ssl=/usr/local/opensslv1 --with-fpm-user=www-data --with-fpm-group=www-data --with-libdir=/lib/x86_64-linux-gnu --enable-ftp --with-gettext --with-xmlrpc --with-xsl --enable-fpm --disable-shared
Compile and install:
make
make install
We can now enable this additional PHP version in ISPConfig
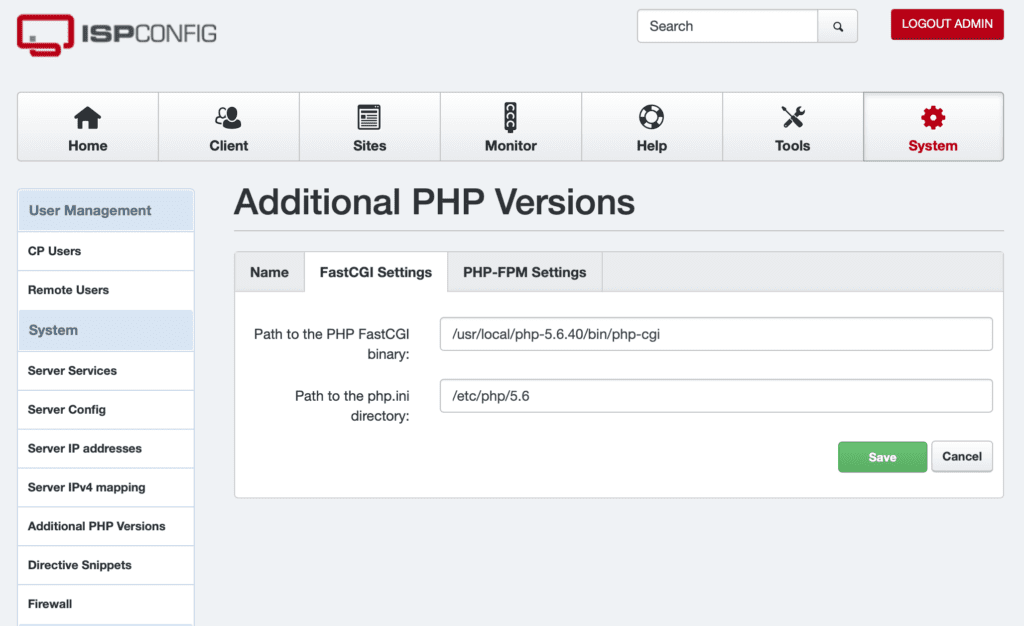
Log into the ISPConfig UI as an administrator, open the System Tab and navigate to “Additional PHP Versions”
Select your server, a client (if you want to constrain use) and give it a name (e.g.: PHP-5.6)
In the FastCGI Settings, set the Path to the CGI Binary (use your own install path!):
/usr/local/php-5.6.40/bin/php-cgi
Path to the .ini directory:
/etc/php/5.6
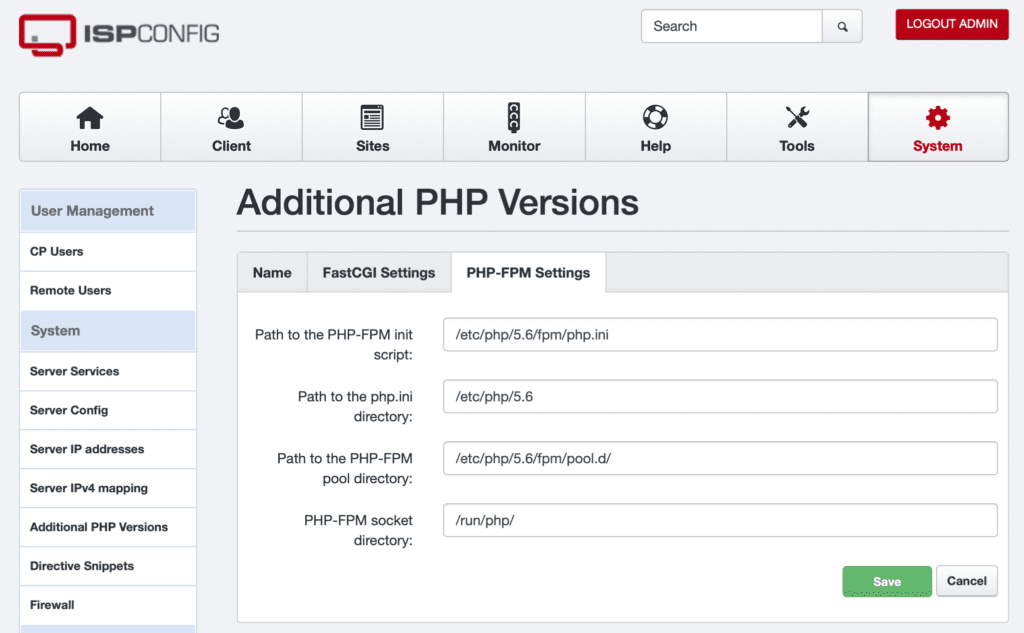
In PHP-FPM Settings, enter the paths to the FPM Init Script:
/etc/php/5.6/fpm/php.ini
The path to the .ini directory:
/etc/php/5.6

In the PHP-FP Tab, enter the path to the PHP-FPM pool directory:
/etc/php/5.6/fpm/pool.d/
…and the PHP-FPM socket parent path:

The php settings above are located under the system-wide path /etc/php/ – chances are you do not have an /etc//php/5 directory. In most cases, you can just take a quick (and very dirty) copy of the PHP7 config path:
cp -rp /etc/php/7.4/ /etc/php/5.6
Next, write an init.d script and register the service with the systemctl daemon:
/etc/init.d/php5-fpm
The script should look like this (adjust paths names for your local installation):
#! /bin/sh
### BEGIN INIT INFO ###
# Provides:          php-5.6.40-fpm
# Required-Start:    $all
# Required-Stop:     $all
# Default-Start:     2 3 4 5
# Default-Stop:      0 1 6
# Short-Description: starts php-5.6.40-fpm
# Description:       starts the PHP FastCGI Process Manager daemon
### END INIT INFO ###

### BEGIN CONFIG and PATHS ###
 php_fpm_BIN=/usr/local/php-5.6.40/sbin/php-fpm
 php_fpm_CONF=/etc/php/5.6/fpm/php-fpm.conf
 php_fpm_PID=/run/php/php5-fpm.pid
 php_opts="--fpm-config $php_fpm_CONF"
### END CONFIG and PATHS ###

 wait_for_pid () {
         try=0
         while test $try -lt 35 ; do
                 case "$1" in
                         'created')
                         if [ -f "$2" ] ; then
                                 try=''
                                 break
                         fi
                         ;;
                         'removed')
                         if [ ! -f "$2" ] ; then
                                 try=''
                                 break
                         fi
                         ;;
                 esac
                 echo -n .
                 try=expr $try + 1 sleep 1 done } case "$1" in start) echo -n "Starting php-fpm " $php_fpm_BIN $php_opts if [ "$?" != 0 ] ; then echo " failed" exit 1 fi wait_for_pid created $php_fpm_PID if [ -n "$try" ] ; then echo " failed" exit 1 else echo " done" fi ;; stop) echo -n "shutting down php-fpm " if [ ! -r $php_fpm_PID ] ; then echo "warning, no pid file found" echo "is php5-fpm running?" exit 1 fi kill -QUIT cat $php_fpm_PID wait_for_pid removed $php_fpm_PID if [ -n "$try" ] ; then echo " failed. Use force-exit" exit 1 else echo " done" echo " done" fi ;; force-quit) echo -n "terminating php-fpm " if [ ! -r $php_fpm_PID ] ; then echo "warning, no pid file found" echo "is php5-fpm running?" exit 1 fi kill -TERM cat $php_fpm_PID wait_for_pid removed $php_fpm_PID if [ -n "$try" ] ; then echo " failed" exit 1 else echo " done" fi ;; restart) $0 stop $0 start ;; reload) echo -n "reloading service php5-fpm " if [ ! -r $php_fpm_PID ] ; then echo "warning, no pid file found" echo "is php5-fpm running?" exit 1 fi kill -USR2 cat $php_fpm_PID echo " done" ;; *) echo "Usage: $0 {start|stop|force-quit|restart|reload}" exit 1 ;; esac ### The End ###
IMPORTANT:
If you did copy the /etc/php/ directory from version 7 to re-use for version 5, you need to edit the paths and socket file names pointing to the newer version in these files:
/etc/php/5.6/fpm/pool.d/www.conf
/etc/php/5.6/fpm/php-fpm.conf
And possibly others. To be sure, run a recursive search for files containing the path designation:
grep -r 7.4 /etc/php/5.6/
Make the init script executable and register it as a system service:
chmod 755 /etc/init.d/php5-fpm
systemctl enable php5-fpm
systemctl start php5-fpm
In case the service doesn’t start – if your configuration files are, for example, still pointing at the php_fpm version 7.4 socket paths – run:
systemctl status php5-fpm.service
With the FPM process running, you can now activate that PHP version in ISPConfig and it becomes available for your web site in the Sites panel. Test your installation using a phpinfo file in your web root containing only this line:
<?php phpinfo(); ?>
(Don’t leave this file up there – it provides too much information to anonymous visitors)
Other good info and much of the basis for this article can be found here:
https://www.howtoforge.com/how-to-build-php-5.6-fpm-fastcgi-with-zend-opcache-and-apcu-for-ispconfig-3-on-debian-7-wheezy
Thanks to Till and the ISPConfig Team for their great work.

mac-tech’s co-founder and this post’s author, Florian Feuser, explains, “The web hosting management app ISPConfig makes it easy to switch back and forth between versions of PHP – except the Apache module cannot be swapped out, therefore we are limited to using the actual PHP binary through the FastCGI and FastCGI Process Manager (FPM).”
Comments are closed.